The thermally formed AmeriWall surrounds have structural strength and durability. This means they will not crack or yellow. When purchasing a three-panel shower enclosure, you’re purchasing a product that’s designed to be long-lasting. Plus, our acrylic shower walls are as stylish and durable.
Shower installation is simple and quick. After the appropriate plumbing has been completed, the enclosure walls can be installed over building code approved drywall in a few hours. Installation can be done by you or your contractor.
Our 2-piece corner shower enclosures can be purchased in bulk for companies who are upgrading or installing a large number of baths or showers. By using one of our prefab kits, you can change the entire look of a bathroom, making it brighter and modern.
These kits can also be purchased in a single quantity for homeowners who are looking to revamp and update a worn shower. Our 2-panel or 3-panel shower enclosure are seamless and water resistant, which eliminates water leakage and other common problems.
Aside from the look and functionality of our shower enclosure kits, the price tag is what most of our customers enjoy. You don’t have to spend tens of thousands of dollars to get a modernized space.
Our acrylic shower walls are affordable and manufactured in Hayward, California. All our enclosures are compatible with frameless shower doors and shower curtains.
No matter if you’re purchasing a single shower enclosure or dozens of them, we offer a price that can’t be beat. Contact us for more information!
Bathroom remodel projects can quickly increase your home’s resale value. However, they can be expensive. But that’s not the case if you choose American Bath Enterprises, Inc products. Our prices are highly affordable, no matter the size you choose.
Click here for the latest pricing.

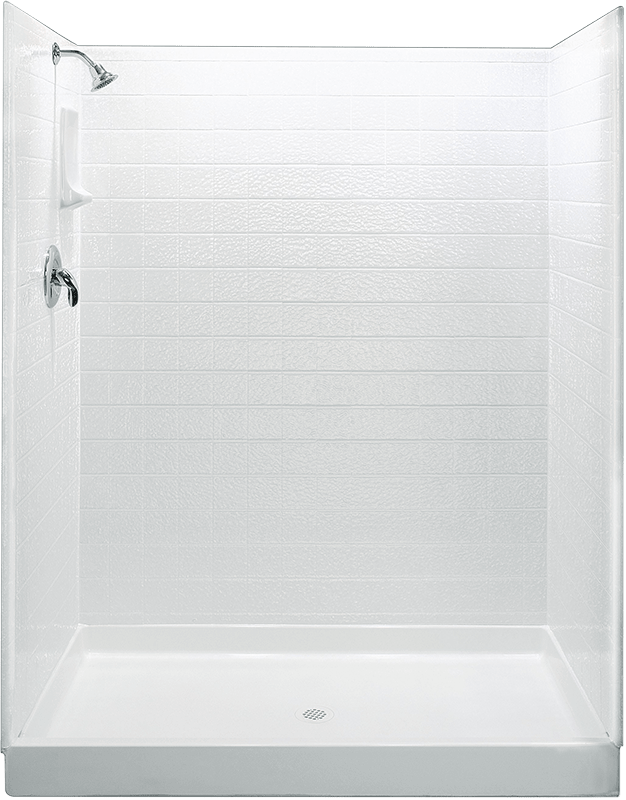
Alternate Pattern – Subway Tile
- 2-piece or 3-piece enclosure with interlocking walls, Subway Tile pattern
- Designed with ¾-inch walls and tapered bullnose edges for seamless installation
- Made from long-lasting, glossy bright white acrylic
- Can be easily cleaned with mild soap and water
Learn more about the subway tile pattern.
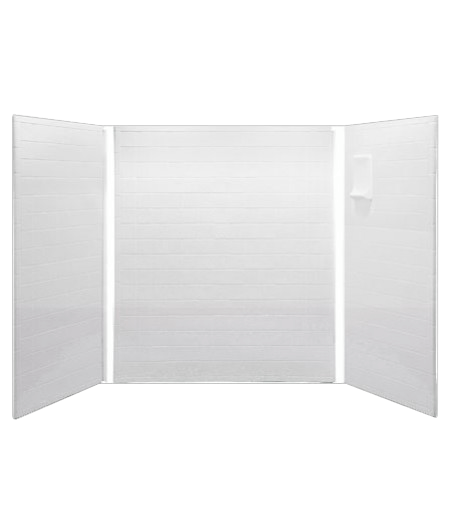
Measuring your bathroom size for a 3-sided shower enclosure can be difficult without understanding the necessary steps. For a bathroom remodel with a 3-piece shower wall, follow the steps in this video:

| Tub & Shower Wall Installation Video |
Single Window Kit Installation Video |
|
|
|
|
| Corner Shelf Installation Video |
Double Window Kit Installation Video |
|
|
AmeriWall™ Shower and Bath Wall Enclosure Installation Instructions:
- Suggested Tools: Angle grinder with 4½” metal cutting disc or jigsaw, caulking gun, rubbing alcohol, hole saw or drill, measuring tape, safety goggles, straight edge utility knife
- Adhesives: 10-12 tubes of LOCTITE Power Grab or compatible construction-grade adhesive for tub surround, 1 tube of DAP 100% Silicone White, 1 tube of ALEX Painter’s Acrylic Latex Caulk
Complete any necessary plumbing before installing the AmeriWall™ enclosure. We recommend that you install AmeriWall™ bath and shower wall enclosures over building code approved moisture-resistant sheetrock or other solid surface wallboard materials.
NOTE: The wallboard material should not touch or overlap the vertical mounting flange of the bathtub or shower pan. For best results, leave a 1/8” gap between the bottom of the wallboard and the top of the vertical mounting flange.
Installation Instructions
- Step One: Dry-fit the panels. Before applying adhesive, dry-fit all the wall panels on top of the bathtub or shower pan.
- Step Two: Measure the width of the back panel and trim the left vertical side if needed.
- Step Three: Drill plumbing holes. Carefully measure and drill holes in the panel to accommodate the shower head arm and mixing valve. Make sure the plumbing protrudes through the panel when the panel is put into position.
- Step Four: Apply adhesive to the left panel. Place the panel in position and apply pressure top to bottom on the panel.
- Step Five: Pull the panel away from the wall to allow the adhesive to de-gas and become tacky. Inspect the wall and apply adhesive to fill the gaps where the wall doesn’t make contact.
- Step Six: Apply a bead of silicone caulk to the channel on the right side of the panel and the top of the tub or the shower pan where the panels will rest.
- Step Seven: Repeat steps four through six for the back panel.
- Step Eight: Repeat steps four through five for the right panel.
- Step Nine: Trim the leg kit to fit the height and contour of the tub and mount with construction-grade adhesive.
- Step Ten: Clean all seams where the panels are joined and meet the tub or shower pan with denatured alcohol before applying silicone caulk.
- Step Eleven: Caulk all outside perimeter seams with acrylic latex caulk. Include the edges and the top of the panels.
Liquid Adhesive
Construction-grade adhesive and caulks tend to be very flammable. When using the liquid adhesive for installing AmeriWall™ products, be sure to follow the manufacturer’s instructions and warnings.
Acrylic Cleaning Instructions
Wash with mild soap/detergent and lukewarm water, using a clean cloth or sponge. Rinse well and blot dry with a damp cloth or chamois.
For stubborn stains or scuff marks, use Gel Gloss. This is an excellent one-step cleaner and polishing product. Alternatively, you can use any other acrylic-friendly cleaning products available at most local hardware stores.
For soap scum, use any acrylic-friendly soap scum remover that should also be available at most hardware stores. You can find them in most bathroom cleaning aisles in any store or supermarket.
Abrasive Cleaners
Never use abrasive cleaners, strong household cleaners, window cleaning fluids, scouring compounds, gritty cloths or solvents on AmeriWall™ surfaces.
PRINTABLE ORDER FORM
Are you ready to order your brand-new shower surround for your bathroom? Check out our PRINTABLE ORDER FORM or contact us at (888) 228-4925 for more information about our popular shower wall surrounds.